Sunday, 27 March 2016

trifold babushka

I used my old Groovy scoreboard to create a trifold card from a asheet of white A4 card, and marked a point 2" up from the bottom of the left hand corner. I drew a line from this point to the top of the right hand edge of the middle fold.

background came next - distress inks in wild honey, barn door and peeled paint were splodged onto a blending mat, spritzed with water and mopped up with white card.
Once this was dry, I cut it into 3 panels.

I stamped the larger building into the centre of one panel, and the smaller one towards the bottom right of the second pamel, using vintage photo distress ink. i used a waterbrush to add shading to the buildings, and a white pen to add highlights.

The babushka dolls were stamped into the centre of the last panel, stamping the two smaller dolls first. I then masked these with masking tissue before stamping the largest doll behind them.The dolls were coloured with distress inks in wild honey, barn door and vintage photo using a waterbrush.

I trimmed the panel with the dolls to fit the front of the card, glued it down, and then carefully cut along the diagonal line, making sure to cut around the heads of the dolls. The easiest way would be to stamp the dolls at the bottom of the last panel of background , and cut them out and glue them on after trimming the diagonal and glueing the cut-to-size background panel  to the front.

I lined up the buildings behind the dolls before marking where to trim the centre panel and glueing it down. the last panel was trimmed so that the buildings were in the bottom corner right hand corner of the panel.

The colours are more accurate in the scan of the folded card, they look a bit washed-out in the photographs.


Friday, 18 March 2016

babushka 2


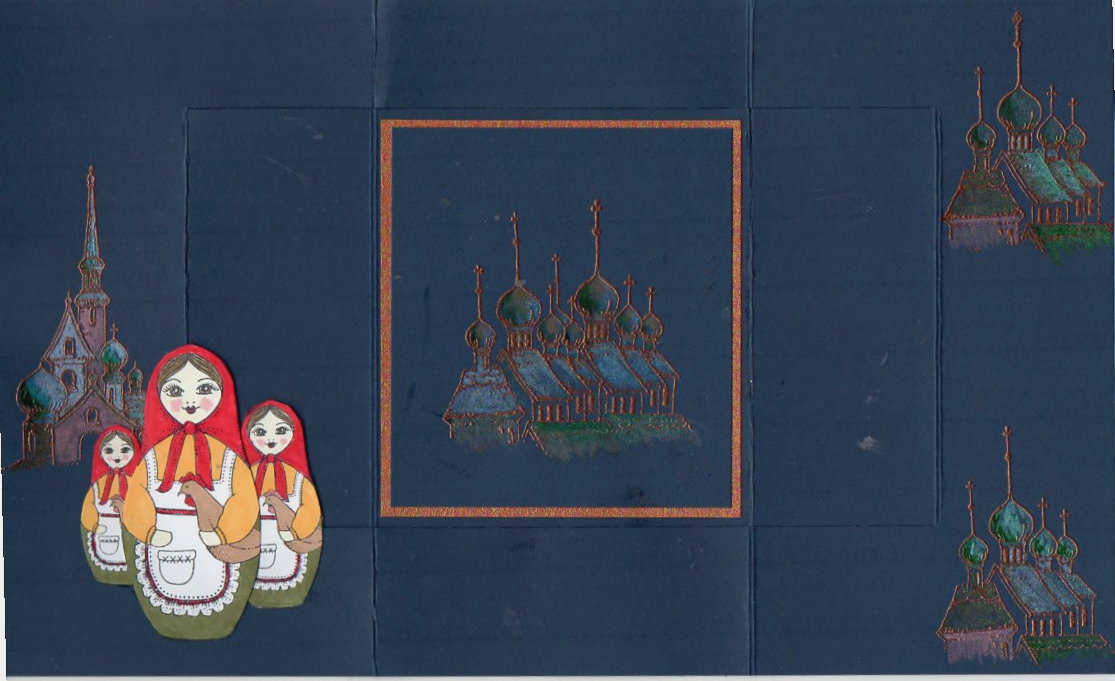
 Another play with the Babaushka dolls - I had some dark  blue card blanks left over from a workshop that needed using, and this is the final result.
The colours are more accurate in the rather dark scan of the whole card flat at the bottom of the post, the ones I took outside in the sun this morning are rather light, and my photo-editing skills are not up to the task of correcting the colour.


The images of the buildings were stamped onto the base card and again onto a piece of blue cut to match the centre panel in versamrk ink and embossed with copper EP. They were coloured using ann old set of H2O paints, as I have seen photos of Russian buildings with gold domes.
The centre panel had a copper mat before being glued in place.
 

The three dolls were stamped onto white card, coloured with marker pens and cut out before glueing individually onto the front of the card. the smallest one is glued flat, and for the other two the glue is added only to the card front - if you glue the dolls, then you can easily end up with the card stuck together!
This card uses a whole sheet of A4 card, and folds down to DL, so easy to post.

Wednesday, 16 March 2016

CB colour challenge 21

A lovely spring-like colour palette for this month's challenge over at Chocolate Baroque, and this is my version.
Yet another brusho background, using just leaf green and turquoise on watercolour paper, with the large patchwork butterfly stamped in black and clear embossed. The butterfly was stamped and embossed a second time onto white card and coloured with marker pens before cutting out and mounting over the first image.
Trimmed down to 7.5" square, edges ruled with green marker pen to give a faux mat, mounted onto an 8" square white card blalnk.

Monday, 7 March 2016

babushka dolls


 it was great fun playing with the new Babushka doll stamps from Chocolate Baroque, although I did wish that they had been larger stamps!
I found a pack of readymade card blanks from years ago that were just the right size, ending up at 15.3 cm square when folded down.
I dabbed distress inks in tumbled glass and peeled paint onto a craft mat, spritzed wuith water and mopped the colour up with a sheet of white card.
I cut three pieces out of this once dry to make the panels. The side panels I stamped onto directly, using black Memento ink , but the dolls were stamped onto spare white card

All the images were coloured with watercolour pencils, then the dolls were cut out and mounted onto the diamond shaped piece for the centre of the card.
I added orange mats to pick up the colours of the dolls.
The colours in the scanned image are more accurate than those in the photos, an overcast day was the brightest I could manage when I took the photos -needless to say, the sun has now come out!

Thursday, 25 February 2016

roses

 This beautiful rose stamp is crackling rose, a big stamp that is a delight to colour in.
I used some leftover card from a workshop that had been coloured using shaving foam and brusho powders for my background, and stamped the image in black memento ink.
Image was coloured using my favourite watercolour pencils and a waterbrush. The matt is a dark green card.
The base card 7"x7" was stamped with the studded lattice stamp using a green adirondack ink, which was also sponged round the edges.
My second card using the slightly smaller floribunda net stamp is on a 5"x7" white card blank.
The image was stamped in versamark ink onto gereenc ard and white embossed. I painted the leaves and roses with diluted white reinker, and once that was dry coloured them with marker pens.
Mats of pink and green card finished this off.

Wednesday, 17 February 2016

live,laugh,love

 Steampunk was never my scene, but having played with the steampunk butterfly stamps, I fell in love with the roses, and treated myself to the punky hearts set of stamps in the recent Chocolate Baroque sale as that had more roses.......I also got a stencil (among other things) and felt that I really had to use them.
Having bought some canvas boards after making my first ever canvas at a Clarity East workshop
I went totally wild and made a canvas using the lovely colour scheme from the CB Colour  challenge 20.
Throwing caution to the wind, I used brusho powders for the background, reasoning that I had a load of white gesso to cover it up with if it didn't work! I just sprinkled red, orange and yellow over the canvas board and sprayed it with water. It looked fine wet, but the colours faded to a pastel when it was dry, so I added more red and spritzed it again and let the colour dribble down.
The cog stamp from the butterfly set was randomly stamped in grey as a background.
The rose was stamped twice onto a sticky label and the heart once, coloured with promarkers and cut out. I stamped the heart in black memento onto the canvas to give me the key, to save some fiddly cutting out. Using the stamped image as a guide, I stuck the cutout roses down, and then the cut out heart over the top.
I lined the words of the stencil up on the left of the canvas, and stencilled them with what I thought was a white embossing paste - it turned out to be pearlised translucent, which didn't show up at all well when dry! A quick recovery job, line up the stencil again and sponge black archival ink through - it didn't do the stencil any favours, but at least I could see the words!
Dark brown acrylic paint ws roughly brushed round the edges to finish - I was quite pleased with how it turned out in the end

Friday, 12 February 2016

floral musica

 Two cards today using the lovely new floral musica stamp - it is a big stamp, perfect for a spot of peaceful colouring in, and really doesn't need much else to make a card.
The first card Istamped the image in brown ink onto a very pale beige card, coloured with watercolour pencils, then cut out using a fancy die, and edged with a green promarker.
The background panel was a dark brown card embossed with a music image embossing folder, with the music highlighted with some very ancient gilding wax.
The base card is a 15x15cm kraft card blank
My second card was also coloured with watercolour pencils, stamped with black ink onto white card, with a wash of old paper distress ink over the music background.
I didn't have an oval die which fitted the image, so had to handcut the oval, which I mounted onto a dull gold diecut mount.
The base card is white 15x15cm, randomly stamped with the same image in old paper distress ink.