Saturday 27 September 2014

poinsettiia wreath

 I wanted to use the poinsettia stamp from the Chocolate Baroque  Holly bells set, but couldn't immediately  think of a way to use it on a card, so thought I would go mad and try to make a wreath.
Of course, I couldn't find a readymade wreath shape, so I liberated some packaging from a local supermarket and made my own, using 2 different sized plates to draw round and cut out. I cut two out, as the card wasn't very sturdy, put them together and wrapped green ribbon round to hold them together and make a hanging loop.
I added die cut leaves in green card using the tattered leaves die from Tim Holtz and glue gel.
Next I stamped loads of poinsettias onto red card using black versafine and clear embossing powder, cut them out and glued on with more pinflair glue gel.
Next was another layer of poinsettias on the inside of the first layer.


I thought that it looked a bit flat, so cut into some of the images and curled a few leaves up to give a bit of dimension, then went really mad and cut the centres out of the last few stamped poinsettias, and cut and curled the leaves before decoupaging them over some of the base images, then added a few more leaves as most of the first ones had been covered up by now!


I gave up at that point, and hung the wreath on the front door to get a photo of the finished  item - it wouldn't be suitable for outside use, though maybe if it was given a good coat of spray varnish it may last a little while outside.
Apologies for the photos, the flash was reflecting back off the images - would have been much easier if I could have scanned it!
Ones outside are much better.................amazing the difference a bit of sunshine makes........

Wednesday 24 September 2014

santa

This is my final card as a guest for Chocolate Baroque  - I have had great fun playing, and thank you to Glenda and Lesley for inviting me.
The santa and sleigh are both from the Santa Baby set, combined with a brusho inks background again.
This background was one that resulted from the afternoon playing at Gissing, using Moira's perfect pearls dabbed on with crunched up cling film before using the brusho inks in grey and turquoise, with quite a lot of water. Once it was dry, it looked like a mountain in snow, so I thought it would be ideal for santa............
The sleigh looked a bit lost without something to pull it, and my reindeer stamp is definitely of one in the sky, so you will to assume it is still being loaded up!
I stamped the sleigh in black versafine ink and clear embossed it directly onto the background -which was when I discovered that the pearly bits didn't like this very much. Fortunately the tricky bits stamped ok, so I stamped the sleigh onto white card , coloured the body and parcels with promarkers and just cut this bit out and glued onto the original image. I brushed stormy sky distress ink beneath the sleigh to give Santa and the sleigh something to stand on
Santa was also stamped separately, coloured, cut out, and mounted in front of the sleigh.
I matted this onto pearlescent silver card, then onto blue card coloured with promarker to sort-of match the blues in the background, then onto a white 7" square base card.
Have to admit to stamping and embossing the greeting in silver before I stuck on the matted santa - I am very good at getting stamped greetings squiffy , but found the clear stamps to be really good. My small greeting is stuck onto the smooth side of a small clear ruler, so I know it is straight to begin with, and I can use the markings on the ruler to help place the greeting.

Sunday 21 September 2014

playday


Had a good afternoon playing at Gissing with Moira, Barbara, Liz and Jill last Sunday- it was a shame Janet was ill and couldn't join us; we only actually did one card, the rest of the time we were playing with brusho ink powders...........
The card on the left is my version of Moira's original, inspired by You-tube originally, then Eileen Godwin.
Moira had unfortunately left the precut circles behind, so we ended up using squares instead - being naturally awkward, I stuck mine on diagonally instead of square like everyone else, but I did stamp and cut out the flowers, even adding the gems in the centre!
Rather a poor scan, but far better than the photo I took, believe me!


For the remainder of the time we played with brushos - only Moira and I had used them before, it was very interesting watching everyone's faces as the inks spread! On some of them we also used liquid  perfect pearls, which gave a lovely shimmery effect.
I ended up with a nice pile of background papers , and have used one of them here with the angel from the new  Chocolate Baroque set A child is born. She was stamped in black versafine and clear embossed before painting with H2Os - I haven't used these for ages, and really must get some more of them.
I discovered that the sheets with a lot of  the pearls resist being stamped onto, and that the H2Os won't cover the splodges of pearl either, which was why there is a golden angel on a yellow background instead of a snowy blue/grey sky one!

Wednesday 17 September 2014

holly spray

·   
Warning, this is a long post for the second of my guest posts, so grab a mug of coffee first! Pictures in the order I did the cards, so a bit of dodging about.............
This was the stamp I went for immediately from the Holly Bells set as I thought it would go well with brusho inks – BIG mistake! Brushos need a really bold stamp, as I discovered...................
Many  sheets of card later, I finally got an idea I thought might work – stamp the image first, emboss, then thoroughly damp the card before adding the tiniest amount of powder using a very fine brush just where I wanted it............................I really thought I’d cracked it, until the colour started spreading ....and spreading.... all over the card, and not just where I wanted it! Spraying with more water and blotting with kitchen roll finally toned down the colours, but the rest of the piece of card was a very splodgy mess.
In desperation I trimmed it down fairly close to the image, mounted it onto a red panel, then onto the white 7x7 base card, added the greeting in gold embossing powder.

Back to ‘normal’ it was, and a group of CAS cards...................

Masked off the panel towards the top of the 7x7 card blank, stamped the holly spray with black versafine and clear embossed.
Brushed scattered straw and wild honey distress inks round the image, then added a line of brown watercolour pencil  under the panel (thanks for the tip Lesley) and brushed it with a water brush then replaced the bottom piece of masking paper and added more wild honey.
Coloured the image with water-based marker pens.
Greeting from the clear stamp gold embossed along the base of the card.
Marks are on the scanner, not on the card! - I am fairly rubbish with a camera, think Ii need to hijack a better one from OH.......

A smaller version on a 6x6 card, using fired brick and forest moss distress inks, and a smaller clear greeting- for this version I used a sheet of A4 card vertically, stamping the spray several times down the card and gold embossing it . Trim to the size you want, colour the berries and leaves, then sponge distress inks around the image before mounting onto a base card and gold embossing the greeting. 
I also used this system with a sheet of card sprayed with red glimmer mist – the image was stamped in black versafine, clear embossed, berries highlighted with bleach and a gel pen, then trimmed down to fit on a 6x6 white card base.
It also worked for the brushos, once I had given up on traditional colours – I dropped blue and purple powders onto a  sheet of A4 card, sprayed heavily with water and left it to dry overnight. I then stamped the spray with versamark and white embossed it, highlighting the berries with bleach again.
This time after trimming, I mounted the panel vertically on a 6x6 white card base and stamped and gold embossed a greeting across the centre of the card.

Depending on the size of panel you want and the orientation of your card, you can get at least 4 out of a sheet of A4, so a good way to batch make cards, which is what we need to do at Christmas.
The greeting stamps are clear stamps, bold on the first two cards and mini
for the rest.

Wednesday 10 September 2014

Victorian Christmas

I thrilled to be asked to do a blog post by Glenda, as I have always loved her stamps since discovering them on C&C many years ago, back in the days when they only came on wooden blocks.
When I received my stamps to play with – Santa Baby and Holly Bells – the one image I really couldn’t see how to use was the mantelpiece – to me, it was unfinished, I wanted the rest of the fireplace! Funnily enough, it is the one I have used the most..............
My moment of inspiration came when I was using a friend’s holly wreath stencil at a craft afternoon and suddenly thought that the mantelpiece stamp would fit in the centre. I quickly stencilled it in vintage photo onto some spare card and took it home to play.
To me, this was a very Victorian image, which was why everything is vintage photo, although they are not really Christmassy colours.
 I stamped the image in the centre, coloured it by dragging the colour out with a waterbrush. I sponged scattered straw very lightly round the image, then vintage photo working from the edges in towards the holly, finally adding a touch of black soot in the corners.
Matted onto dull gold and dark brown before adding to a white 7x7 card base.

One thing I love about CB stamps is how well they work together, (and indeed with other makes of stamps ) and for the second card I dug out an old EI stamp to use as a foreground image – this time I wanted lighter silvery tones, still not very traditional Christmas though, and still very Victorian.
I stamped the image with smoky grey versafine, coloured it with watercolour pencils and sponged weathered wood round the edges, It was matted onto dark and light pearlescent silver card, then onto a 6x6 card blank dusted with weathered wood again. The maid was stamped with smoky grey and cut out, mounted onto foam pads slightly overlapping the layers.

The final effort got a bit brighter in colour.

I stamped a tree image from one of the old Christmas sets sideways to make the branches of a Christmas tree down the left side of a 13cm square of white card, using iced spruce ink. I roughly
cut a mask for the tree branches and stamped the mantelpiece behind the branches using a brown ink pad. I coloured the image with marker pens, then sponged old paper ink round it.
Apologies for the squiffy photo, I did it in a hurry as my scanner didn't like having the screen cleaned and decided to add interesting splodges everywhere............

I am playing very happily with the other stamps, so watch this space!

Monday 8 September 2014

Creative bloghop

This was the idea of a now-anonymous blogger ages ago - the idea is that the creative bit includes anything  artistic, crafts,  needlework, painting etc etc, you name it. You have to write a bit about yourself, answer 4 questions, add photos (optional) and, like a game of tag, nominate 3 people to follow the next week.  I got tagged by Kate Perry, who is a very talented crafter living in Spain who I know through what was then the Graphicus Guild, and is now the Chocolate Baroque forum.
So here goes -
I am retired, living in Norfolk with a very patient husband who puts up with an ever-increasing mountain of  overflowing craft stash - 3 grown-up children all away from home who have also learned to put up with my craft stuff, in varying degrees of resignation!
I have always loved paper, pens and pencils  and spent all my pocket money at the local stationers first, then at the art store later -after leaving school  I spent 4 happy messy years at art college, first in Preston then in Liverpool where I ended up changing courses to the school of printing and studying typography - I got just as messy, only this time with printer's  ink!  College diploma and City & Guilds certificate  (even a medal!) did not lead to jobs, so I ended up as a civil servant in London.
I started crafting seriously when my daughter was around 11, with quilling and parchment craft initially, and bought my first rubber stamp and mini ink pad because I was fed up of quilling leaves. The next ones were small square stamps to make my own teabag folding papers, which  were  annoying to use and cut out individually and then colour in with felt tip pens.
Then I discovered Create & craft TV, where thanks to Jayne Nesterenko  I found out how to use some medallion stamps I had ordered at a show, and forgotten how to use by the time they arrived. I became hooked on stamping,  especially when I watched Glenda Waterworth - I still have some of the wood mount stamps from then. Once I discovered unmounted stamps -especially when they were so much cheaper and took less room up - there was no stopping me. Even I have to admit I have far to many stamps now, but I still can't resist buying new ones, especially from Chocolate Baroque, and trying out new techniques.
I have been lucky enough to run several workshops for the WI, which have been great fun, if hard work.

Now the questions...............
1. What am I working on
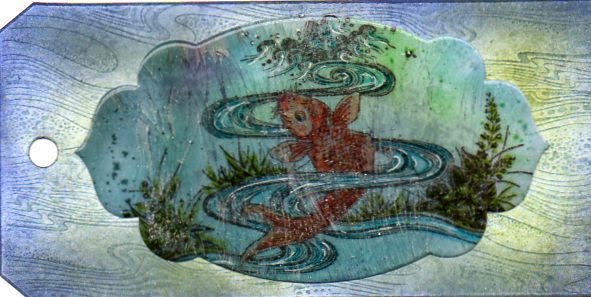
    my tags for the monthly challenge at Chocolate Baroque - this year it is a technique challenge, and this month we had to use embossing cracked in the freezer.

These are my two, after several failed attempts, using an old koi carp stamp from Elusive Images and a fragments stamp from Chocolate Baroque on the actual tag. I discovered that clear embossing powder will actually go opaque if you you reheat and refreeze it enough times! - the backgrounds to the fish are using brusho inks, which are my current addiction.
The next set of tags are to use zentangling, which is definitely not a favourite of mine..........
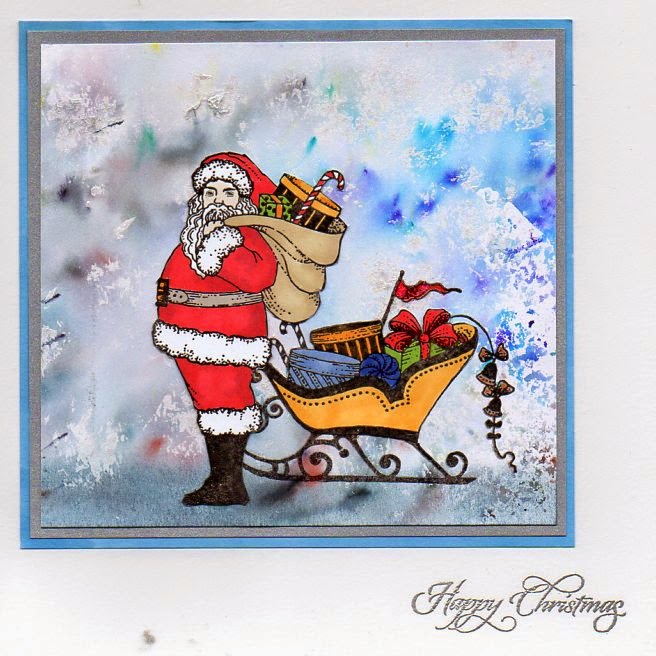
I have new sets of Christmas stamps to play with as well, which will hopefully be blogged on Wednesday

2.how does my work differ from others   and
3 why do I create what I do
I put these together, because to be honest, this is not something I have thought about, I just play! I do prefer simpler designs - I hate huge ribbon bows and loads of flowers on cards , and it takes a lot even for me to add ribbon at all. I usually make cards, because I like the results of my playing to be useful - I am not a fan of altered spoons and the like, if I have a wooden spoon I will be cooking with it!

4 how does my creative process work
As I said, I normally just play - I rarely start out with an idea of how I want the finished card to look. I may want to use a particular colour scheme or stamp, so i start out with that. I have to admit to being a very messy crafter, usually ending up with an A5 size space on the table to actually work in - the rest of the the space is ink pads, stamps that I thought would go well with what I started out with, and hopefully some scissors ( I swear there is a black hole on the table which swallows scissors!). I have several boxes of 'orphan' stamps which need returning to their sets, although some sets do manage to stay together probably as they are used so much.
I love challenge blogs, they are great for kick-starting ideas - I follow several, and am always discovering new ones through bloghopping, but very often never get around to actually doing an entry; it does annoy me that often I find a new challenge that I have just blogged the ideal card a couple of days earlier - sigh - though it would annoy me even more if everyone could backlink old stuff all the time!

now for my victims -

Moira Walters, who is a very talented crafter and a great source of inspiration, and who keeps me up to date on all things crafty. Moira runs craft classes - admittedly in the wilds of Norfolk at one of the best-hidden village halls I know -she does not have the best of health, and will I hope be able to add her blog next week.

Jane Aldridge, another very talented stamper , who says
I am an enthusiastic crafter who is an addicted rubber stamper and zentangler. I live in Norfolk with my husband and two furry companions. For many years I was a University administrator, until we took the leap and moved from Essex to Norfolk to have a different pace of lfe. i am lucky enough to have opened my own craft shop a couple of years ago partnered with a great friend, Sarah. I regularly attend local crafting events such as Sincerely Yours and run workshops and clubs as well as put up something creative on my blog everyday. I have a mixed taste of styles - I like collage mixed media style, steampunk as well as clean and crisp styles too. I love to be inspired by all the creative talent you can now view online and am keen to try lots of different styles and techniques

.Elaine Friend another very talented crafter, who does the most gorgeous needlework as well as stamping, and another who does not get around to blogging as often as she should!

Wednesday 3 September 2014

snippets challenge

Pixie snippets challenge is one that I have often thought of doing , having admired that way Val has worked her way through her oddments collection, but never got around to actually doing it - partly because I try to throw out all the bits I used to save!
However, my current addiction to playing with brusho inks has meant that I had a little pile of bits that I couldn't bear to throw out.............then the sale at Chocolate Baroque tempted me..............
The result is my first ever card for this challenge - the stamp comes from the holly bells sheet,and was stamped with versamark and gold embossed onto an A6 card blank, as was the greeting.
The same stamp was stamped in black versafine onto some of my scraps, and some were so small I could just squeeze on one layer of the tree! Layers were cut out and glued onto the appropriate places on the stamped image - and my first Christmas card of the year!
Very quick and simple, and the pile of cutout bits will make several more of the same...................

Monday 1 September 2014

CB colour challenge

The colour challenge over at Chocolate Baroque this month is this one, which has a lot of possibilities......
and i have several ideas lurking that I haven't worked out yet, but the colours just happened to go with a scrap of brusho-inked card left over from something else, just  big enough for a tag. I came across this old stamp from the Graphicus days, think it nay have been one of Guild stamps, which just seemed to go with my scrap. I stamped with brown ink and clear embossed  the image, then highlighted the birds with bleach before mounting onto a brown tag.
apologies for all the  space, just can't get rid of it, and gave up before Blogger drove me totally loopy!


.