Sunday 31 May 2015

shepherd's purse

Yesterday  was the Clarity east workshop with Janet Pring at Bawburgh, mainly using the new shepherd's purse stamp set.
This was the first card we made, masking off the central oblong, sponging with distress inks (milled lavender here), then stamping the word stamp with the masking tape still in place to create a background. Two of the stamps stamped over the top in black archival ink, seed pods coloured with pencils and I bleached out the colour on the flowers. Matching pink and green mats, and a fairly quick card to do - especially if you are like me and leave out the wiggly lines that Janet loves to add round the edges!
The following cards were actually done in the afternoon, using my current obsession, brusho - I was delighted to get the email mentioning this, and both Moira and I turned up with our own boxes of little pots, meaning that we got to make a lot more backgrounds than the others - we did share though!


 The one on the right is my version of Janet's sample card  actually, the left one I masked off the centre and added brusho to make the background to the stamp instead of inking as we did with the first card. The right hand one also shows the difference in colour when you blot the first piece of card with a second piece to get two for the price of one, I used the second print to stamp on.
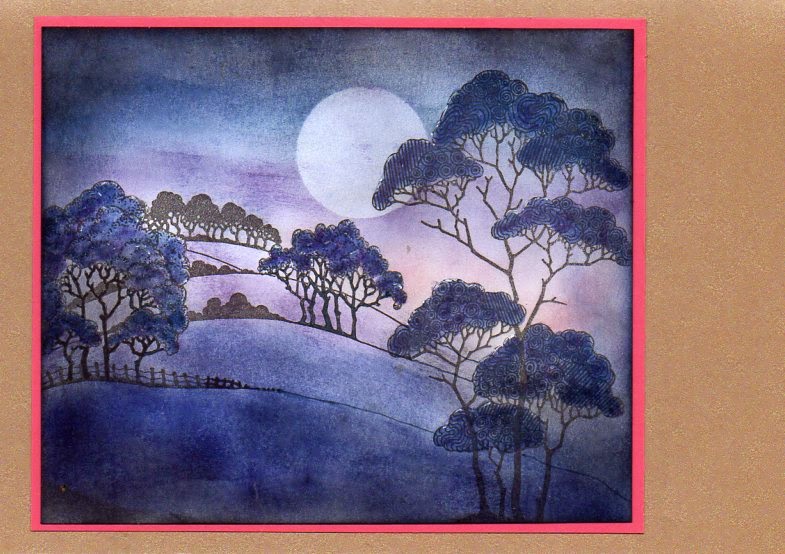
This one I only used the black brusho powder, which gives a lovely muted multicolour effect.


The last two were actually done in the morning, and use a deer stamp and a couple of bullrush stamps from Janet's collection of foliage stamps.
The sample card was coloured with pencils and blending solution after outlining as landscape with a fine liner pen - not my scene at all! I used distress inks and the traditional torn paper to make my landscape, and coloured the bit below the deer stamp to look like water instead of leaving it white for a greeting as Janet had. I also sprayed some water over this bit and blotted it with kitchen roll. I did use the pen to extend the stamp to the side of the card to stop it floating in mid air between the rushes.

I did try the pencil technique - it was far quicker to use inks than pencils - and was not very impressed - probably I didn't use enough pencil in the first place as I couldn't get the blended effect I was aiming for in the sky: it did work a lot better with the water though, where I had used a lot more pencil. I cut this one down to fit a square card, which anchored the deer rather better - some of us did wonder about the designer's artistic licence in having two stags so close to each other and not fighting! Moira reckoned that they had fought and the one on the left had lost...............

Tuesday 26 May 2015

birds n brusho


 finally got around to finishing off the threatened extra birds using the Hobby Art stamps that I started at Gissing - seems ages ago now!
This is the companion stamp to the one we originally used, and I have to admit that I much prefer this version.
The birds were stamped first with black versafine, and then I started playing with the brushos. The texture in some places is due to the amount of water I was using on ordinary smooth card - did sometimes make it more difficult colouring in. Next time I must remember to colour first, then add the brusho!
 On all of the cards I used the same stamp randomly to create the background - just stamped in slate grey for the swing card, leaves coloured using a blender pen and more ink sponged round the edges.

The other two cards, stamped with versamark , clear embossed, then sponged with distress ink in broken chine and peeled paint.

Monday 18 May 2015

Chocolate Baroque challenge

A very quick post for the Chocolate Baroque challenge 10  to squeak in just under the time limit!
As is so often the case, the longer time I have to do something, the longer it takes me to actually do it  - if it is needed tomorrow, fine , next week is more problematical, daft isn't it?
Anyhow it took me a while to find something approaching the required colours especially since my long-neglected glimmer mists mostly refused to co-operate, so it was back to distress inks. The search for the glimmer mists (put away neatly in a drawer, most unusually!) also turned up a long neglected set of stamps, patchwork landscape.
One of this set got a lot of use, so it was way past time for some of the others to see ink for the first time.
I eventually stamped both images in black versafine, then used a variety of ink pads and sponges to create the landscape, mostly dusty concord, chipped sapphire and black soot. the trees were coloured with dusty concord dabbed on with a cotton bud, then painted over with chipped sapphire using a water brush. A few dabs of white pen and a wash of clear wink of stella to try to catch the moonlight on the foliage, trunks coloured with marker pen.
A narrow mat of bright pinky purple card to give a bit of fizz, then mounted onto a base of pearlesent cappucino card

Saturday 16 May 2015

Sunday at Gissing


 Some of the cards from last Sunday at Gissing playing with Moira's Hobby Art stamps and Janet's Claritystamps - always a lovely time with crafty friends, , different stamps to play with , plenty of coffee,  cake and chat - what more could you want? One day I will actually remember to take a photo of all our cards, they all come out totally different!
This first one was right up my street, and uses distress inks, promarkers  to colour the larger leaves in , Hobby Art reeds and grasses stamp. Moira's sample version also used one of the birds - I left the bird out but stamped the feathery grass twice instead. I splashed water over the bottom part of the card and blotted it to try to give a watery effect


Being on a brusho kick at the moment I did a different more CAS version - I got the stamps first, so had time to play while everyone else caught up with all the inking for the background

Janet's sample used the new shepherds purse stamp from Claritystamp, with a masked and inked panel background done first.
I did two versions, one using distress inks and the stamp randomly stamped in a slightly darker yellow across the panel before removing all the masking tape and stamping the flower again in black archival ink across the panel. A wavy line round the edge of the panel and the flowers bleached out where they crossed the inked panel.
Second version used the brusho powders for the background, had to be careful not to over spritz the water to make sure the colour didn't seep under the masking tape.

Monday 11 May 2015

80th and May postcards

 This is the birthday card I made for a friend's 80th birthday recently - she loved it, so it is safe to post now.
I used the butterfly daisy set of stamps from Chocolate Baroque that I used for the April potpourri card challenge swap the background was brusho, image stamped and embossed in gold, flower petals coloured with pencils and leaves were diecuts. The greeting was from Stampin Up, the small butterfly from Hobby Art and the large one hiding at the back also from butterfly daisy.
I actually got way ahead with the potpourri postcards this month, which is almost unheard of! The themes were lily of the valley and/or shamrock green - as you can see, I went for the colour again.
I stamped the lovely fountain scene onto a green brusho background, and used bleach on the top of the building and on the fountain before colouring with pencils. The image wasn't quite large enough for the postcard, so rather than mat it onto green card I stamped an image from gothic fragments down one side and gold embossed it. I thought it looked suitably eastern...................
For the second card, yet more brusho background (you can tell I like this stuff, can't you! I just love the totally random effects)
The hearts from one of the old Elusive Images damask sets which is still available from Chocolate Baroque were stamped onto green card and black embossed, then cut out and stuck onto the base card with foam pads to form a shamrock shape - at least, that is my excuse.

Sunday 10 May 2015

more birds....

 had a couple of spare stamped Hobby Art birds from last Saturday - so had a quick play with the brushos.
Top one the birds were coloured with spectrum Noir pencils, which resisted the brushos nicely, just a blue and a yellow shaken on to the card and spritzed. Card blank was 5"x7"
Second one had the same colours, but a heck of a lot of water, and I tried adding dollops of bleach straight onto the wet card. card blank here was 6"sq
Bleach isn't really controllable this way, but I have found out that a lot of the blue brushos don't bleach out very well - this way, they bleached out beautifully, I rather liked the effect of this, even though the bleach and brushos caused some blistering of the card surface, to be honest probably due to too much water....
Am promised a chance to play with these again this afternoon, so there will be more............

Wednesday 6 May 2015

Diva Red at gissing

 had a great day at Gissing last Saturday with Moira and Janet, mostly playing with Moira's new Hobby Art stamps.
The first one was based on one of Jenny's samples for the recent show on C&C, which I missed. The reed image was stamped in chocolate ink onto a piece of cream card, coloured with pencils, and I sponged the same ink  round the edges rather than matt it onto more card. I stamped and masked the bird onto the circular piece of white card, then stamped the reed stamp again - also sponged round the edges with the chocolate ink as well as a little blue behind the bird. The circle was then lined up over the first image and glued down with pinflair  glue gel to give a slightly raised image.
I couldn't find a backing paper I liked from the pile available, so made my own - the feathery grass stamp was stamped with versamark onto the card blank, then green and brown inks sponged over for a shadowy effect, then the same stamp in chocolate ink in the front.
I also tried playing with the teasel stamp, similar technique but a square centre - the bird and the teasel it is sitting on also got a coat of glitter glue to make it stand out a bit more, as it looked very dark and dreary.
Moira also had the birds on a wire a stamp, I wasn't too keen on these, but they do grow on you!
 Here we used fusible fibres for the birds - remember those from years back? I liked the idea, but wasn't too keen on how mine turned out colour-wise - maybe I need to borrow the stamp and have another go! (am sure I have some of this stuff lying around somewhere)

The last card was Janet's, using Clarity stamps and the Paper Artsy fresco finish paints. Being Janet, she has the complete set, so plenty of colour options!
We used the paints to create the background, splodging them onto the wrong side of a  piece of cut'n'dry foam and dabbing randomly onto the white card.I know I used a lot of the colours, and I think they were smurf, guacamole, hey pesto, autumn fire and a yellow - we then covered most of the card with snowflake, which really toned the colours down and made a fantastic difference. The small grasses were stamped with brilliance ink, which didn't work too well as it came out grey rather than black - I decided I rather liked this in the end as it looked more distant than a black would have.
I added a bit of pansy paint to the remaining piece of coloured card, stamped the butterflies in black archival, added the lovely metallic glaze paint, then cut out the butterflies and used glue gel after shaping them.