Showing posts with label babushka. Show all posts

Sunday, 30 April 2017

more Katya

Today I am showing you two more samples from the Chocolate Baroque tv shows using the lovely Katya - you can tell she was my favourite, can't you!
Katya stamped with black versafine, clear embossed and masked with masking fluid. The buildings from the babushka set were stamped using an old Adirondack multi-coloured dye ink pad that was so old the colours had all merged into an apology for black - very different from the original! It worked for the buildings, as there were still traces of the original colours when the background was spritzed with water to activate the brusho powders, so I got a misty skyline effect.
Once everything was dry, I rubbed off the masking fluid and coloured her using watered down aztec metallic paints.


The second version is a bit more dramatic , and a tad more complicated.
It started out the same way, stamping and masking Katya before stamping the castle from the fantasy castle set, as I thought it looked sufficiently Russian. I coloured the castle with brusho powders and a waterbrush, mostly using sandstone, lemon and leaf green powders. Katya was coloured with mica powders and a waterbrush. I created a layered effect by trimming the castle to a square and cutting round Katya where she was outside the square. I added a square gold mat behind the castle.
The background was randomly stamped with the silhouette palaces stamp using the same ancient ink pad and grey, purple and black brusho powders which all sort of merged into a misty nighttime effect.
I

Monday, 17 April 2017

babushka


Thought I would try something a little different with the babushka dolls, and make a pop-up box card. Normally I would cut out the box, but as I had some ready-made blanks I used those for speed - they were rather shorter than I would have preferred, but worked quite well in the end, as I think that the size I usually make would have been too tall.
Apologies for the picture-heavy post, I felt that I ought to show how they went together if I could.
I used the babushka dolls plate and the silhouette palaces stamps with a mixture of markers, pencils, brushos and distress inks.
The folded flat box fits into an 8"x8" square envelope, and the top panels are 85x80mm, side panels 85x105mm , and the back 85x185mm - sorry for the mix of measurements, but inches didn't work accurately for the panels.


 I stamped the buildings from babushka onto
80x75mm panels for the fold-down flaps, and also at the top of a 80x180 panel for the inside back of the card,using black versafine ink. They were coloured with watercolour pencils.
The pic shows how they were glued onto the base card.


 The side panels were 80x100mm, and here I stamped the smaller stamp from silhouette palaces using black archival ink, then sprinkled lemon, rose red and turquoise brusho powder before spritzing it for the sky.


The same stamp was used at the bottom of a 80x180mm panel for the back, this time using smoky grey distress ink and sponging round the edges with the grey as well.

I stamped 2 large and 1 medium dolls onto white card using versafine again and coloured them with marker pens so that they stood out a bit from the background.
The blank came with 2 bars for the inner box, so the smaller doll was glued to the front of the back bar and the others to the front and back of the front bar at different heights.


two more photos of the completed box from different angles

Sunday, 27 March 2016

trifold babushka

I used my old Groovy scoreboard to create a trifold card from a asheet of white A4 card, and marked a point 2" up from the bottom of the left hand corner. I drew a line from this point to the top of the right hand edge of the middle fold.

background came next - distress inks in wild honey, barn door and peeled paint were splodged onto a blending mat, spritzed with water and mopped up with white card.
Once this was dry, I cut it into 3 panels.

I stamped the larger building into the centre of one panel, and the smaller one towards the bottom right of the second pamel, using vintage photo distress ink. i used a waterbrush to add shading to the buildings, and a white pen to add highlights.

The babushka dolls were stamped into the centre of the last panel, stamping the two smaller dolls first. I then masked these with masking tissue before stamping the largest doll behind them.The dolls were coloured with distress inks in wild honey, barn door and vintage photo using a waterbrush.

I trimmed the panel with the dolls to fit the front of the card, glued it down, and then carefully cut along the diagonal line, making sure to cut around the heads of the dolls. The easiest way would be to stamp the dolls at the bottom of the last panel of background , and cut them out and glue them on after trimming the diagonal and glueing the cut-to-size background panel  to the front.

I lined up the buildings behind the dolls before marking where to trim the centre panel and glueing it down. the last panel was trimmed so that the buildings were in the bottom corner right hand corner of the panel.

The colours are more accurate in the scan of the folded card, they look a bit washed-out in the photographs.


Friday, 18 March 2016

babushka 2


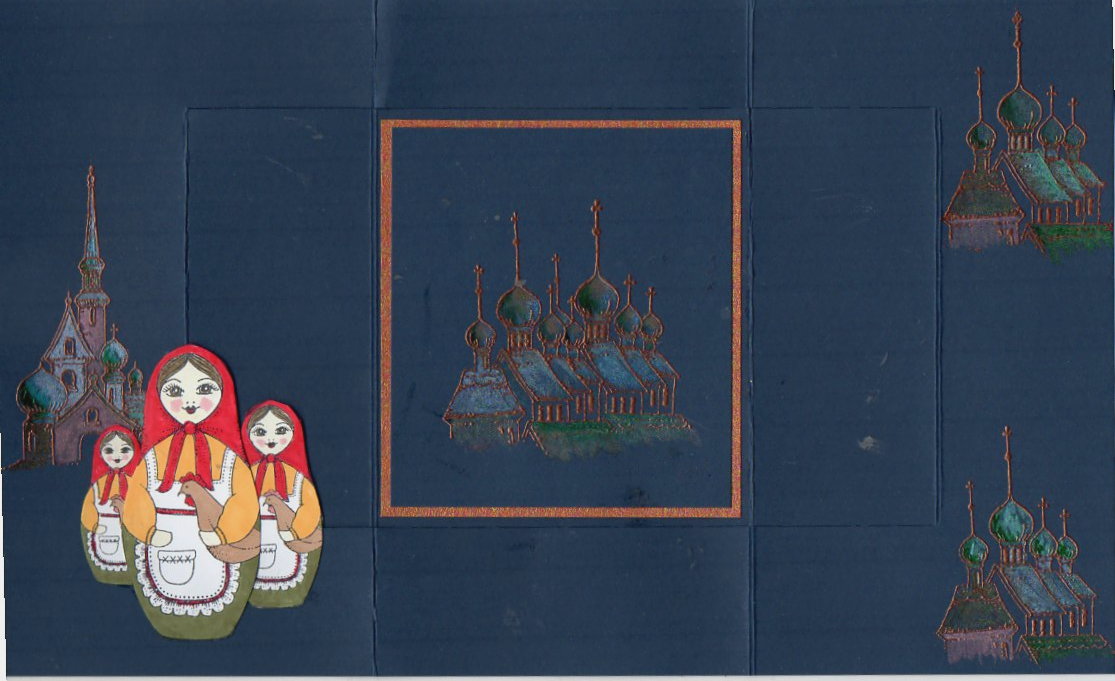
 Another play with the Babaushka dolls - I had some dark  blue card blanks left over from a workshop that needed using, and this is the final result.
The colours are more accurate in the rather dark scan of the whole card flat at the bottom of the post, the ones I took outside in the sun this morning are rather light, and my photo-editing skills are not up to the task of correcting the colour.


The images of the buildings were stamped onto the base card and again onto a piece of blue cut to match the centre panel in versamrk ink and embossed with copper EP. They were coloured using ann old set of H2O paints, as I have seen photos of Russian buildings with gold domes.
The centre panel had a copper mat before being glued in place.
 

The three dolls were stamped onto white card, coloured with marker pens and cut out before glueing individually onto the front of the card. the smallest one is glued flat, and for the other two the glue is added only to the card front - if you glue the dolls, then you can easily end up with the card stuck together!
This card uses a whole sheet of A4 card, and folds down to DL, so easy to post.

Monday, 7 March 2016

babushka dolls


 it was great fun playing with the new Babushka doll stamps from Chocolate Baroque, although I did wish that they had been larger stamps!
I found a pack of readymade card blanks from years ago that were just the right size, ending up at 15.3 cm square when folded down.
I dabbed distress inks in tumbled glass and peeled paint onto a craft mat, spritzed wuith water and mopped the colour up with a sheet of white card.
I cut three pieces out of this once dry to make the panels. The side panels I stamped onto directly, using black Memento ink , but the dolls were stamped onto spare white card

All the images were coloured with watercolour pencils, then the dolls were cut out and mounted onto the diamond shaped piece for the centre of the card.
I added orange mats to pick up the colours of the dolls.
The colours in the scanned image are more accurate than those in the photos, an overcast day was the brightest I could manage when I took the photos -needless to say, the sun has now come out!